Corona Reference: Animations
There are two major ways to achieve animation effects with Corona: transitions and sprites. Transitions (tweening) can be used to gradually change the properties of a display object, such as location, size, or opacity, over a specified period of time. The objects could be native display objects or imported images. Sprites are used for traditional animation, such as a character who's arms and legs move as they walk. This involves using an image sheet that holds the frames of the animation. Frequently, sprites and transitions will be used together.Transition Functions
to()
Most transitions will be accomplished using thetransition.to function, which takes two arguments. One is the object that the transition will be applied to, and the other table that contains the object properties we'd like to transition and some attributes of the transition itself. The basic format is
transition.to( OBJECT , { attributes, object properties })
Included in this attribute list will be the length of time the transition should take to complete. We can also specify
the easing the transition should use, among other optional parameters.
from()
Thetransition.from() function is very similar to the transition.to() function. The difference is that the parameters passed control where the object should begin, instead of where it ends up.
As an example of this difference, we’ll create two squares, each defined at the same vertical distance from the top of the screen. The square on the left is blue, the square on the right is red. When the scene loads, the blue square will be moved vertically by a
transition.to() function, while the red square will be moved by a transition.from() function, both sharing the same parameters:
local blueSquare, redSquare

blueSquare = display.newRect( 200, 500, 80, 80 )
   blueSquare:setFillColor( 0, 0, 1 )
redSquare = display.newRect( 400, 500, 80, 80 )
   redSquare:setFillColor( 1, 0, 0 )

transition.to( blueSquare, { time = 4000, y = 100 })
transition.from( redSquare, { time = 4000, y = 100 })
Note that even though we defined the two squares to be at the same y value of 500, only the blue square starts there, and ends at y = 100. The red square instead appears to start at y = 100, and ends at y = 500.
blink()
To make an object blink, we could use an iteration with a regular transition function that effects the alpha value. But it may be hard to predict how many iterations we’ll need. Instead, we could use thetransition.blink() function. We only need to provide the length of time each blink should take.
The rectangle below will blink at a regular interval until cancelled or paused.
local blueSquare

blueSquare = display.newRect( 200, 500, 80, 80 )
   blueSquare:setFillColor( 0, 0, 1 )

transition.blink( blueSquare, { time = 1500 })
dissolve()
To make one object appear to fade into another, we can use thetransition.dissolve() function. We first need to define two display objects, which could be rectangles, circles, polygons, text, imported images, or a combination. Then, we specify which object should fade out, which should fade in, the length of time the fade should take, and an optional delay time. Note that this is simply fading one object’s alpha value to 0, and fading another in.
transition.dissolve( object1, object2, fadetime, delaytime )You’ll need to make sure the objects are aligned if you want to create the effect of one object “turning into” another.
The following example fades a blue square into a red circle:
local blueSquare, redCircle

blueSquare = display.newRect( 200, 500, 120, 120 )
   blueSquare:setFillColor( 0, 0, 1 )
redCircle = display.newCircle( 200, 500, 60 )
   redCircle:setFillColor( 1, 0, 0 )

transition.dissolve( blueSquare, redCircle, 3000, 100 )
This could be used to transition the color of an object, but you’d actually need two objects: one in the original color, and one in the new color. This function simply replaces the need to create separate transitions for each.
fadeIn() and fadeOut()
If the only transition needed on an object is to change transparency from fully opaque to fully transparent, or vice-versa, it may be easier to use thetransition.fadeIn() and transition.fadeOut() functions. These work on a single display object, and the time and delay can be adjusted as usual. The rectangle below will fade after 0.6 seconds:
blueSquare = display.newRect( 200, 500, 120, 120 )
	blueSquare:setFillColor( 0, 0, 1 )

transition.fadeOut( blueSquare, { time = 600 })
Transitioning Display Object Properties
Not all properties of display objects can be changed via transitions. For instance, we can’t transition the string of text displayed by a text object, nor could we change the type of display object from a rectangle to a circle. We can adjust the position, transparency, scale, and rotation, or combine several transitions for interesting effects.
We’ll start with a simple example, in which we’ll create a circle and use a transition to move it from its original point (100, 100) to the point (200, 300):
If you copy the above code into your app, you should see the transition as soon as you view the scene in the simulator. However, you will probably want such transitions to occur only after another event, such as the user touching the screen. To create such an example, we’ll make two objects: a circle and a rectangle. The rectangle will have a listener attached to it, and when it receives a tap, the circle’s position will be transitioned:
Note that you do not need to specify a new x and y position, unless you’d like to change both. You can also make adjustments relative to the object’s starting position. For instance,
Moving Objects to a New Position
A major application of transitions is creating a simple animation that moves an object from one point to another. Such transitions can be applied to any display object, including text, polygons, and imported images. The transition function’s attribute list will include an x and/or y value of the final location of the object.
transition.to( OBJECT , { time = num_value, x = num_value, y = num_value })
We’ll start with a simple example, in which we’ll create a circle and use a transition to move it from its original point (100, 100) to the point (200, 300):
local myCircle = display.newCircle( 100, 100, 80 )
transition.to( myCircle, { x = 200, y = 300 })
Notice that the transition function parameter list included two things: the new x value of the object, and the new y value.
If you copy the above code into your app, you should see the transition as soon as you view the scene in the simulator. However, you will probably want such transitions to occur only after another event, such as the user touching the screen. To create such an example, we’ll make two objects: a circle and a rectangle. The rectangle will have a listener attached to it, and when it receives a tap, the circle’s position will be transitioned:
local myCircle, myRectangle, myHandler

function myHandler( event )
   transition.to( myCircle, { x = 200, y = 300 })
end

myCircle = display.newCircle( 100, 100, 80 )
myRectangle = display.newRect( display.contentWidth/2, 100, 400, 100 )
myRectangle:addEventListener( "tap", myHandler )
Now when you tap the rectangle in the simulator, you’ll see the circle move. But nothing will change until then.
Note that you do not need to specify a new x and y position, unless you’d like to change both. You can also make adjustments relative to the object’s starting position. For instance,
transition.to( myCircle, { x = myCircle.x + 200 })
would slide the object 200 pixels to the right of where it currently is, without changing the vertical position.
Opacity
We can transition the transparency of an object by including an alpha value in the parameter list:
transition.to( OBJECT, { alpha = num_value })
Remember that the alpha value should be a number between 0 and 1.
Scaling Objects
We can also transition the scale of an object, by specifying the new horizontal and vertical scales individually. These can be any value; a value between 0 and 1 will shrink the object, while values greater than 1 will stretch it.
transition.to( OBJECT, { xScale = num_value, yScale = num_value })
Negative values reflect the object across their vertical or horizontal axis.
Rotating Objects
Transitions may be used to smoothly rotate objects about their (current) center by specifying a rotation value, in degrees.
transition.to( OBJECT, { rotation = num_value })
Recall that rotations (of positive degree values) are clockwise.
Transitioning Multiple Attributes
These transition effects can be particularly interesting when combined. The following example creates a rectangle that, when clicked, will fall from the top of the screen to the bottom while rotating, fading, and increasing in size:
local myRect, myHandler

function myHandler( event )
   transition.to( myRect, { y = display.contentHeight, rotation = 720, alpha = 0.2, xScale = 4 })
end

myRect = display.newRect( display.contentWidth/2, 50, 50, 100 )
   myRect:addEventListener( "tap", myHandler )
Container Dimensions
If you are using a container in your scene, you can transition its dimensions:
local myContainer = display.newContainer( 100, 100 )

transition.to( myContainer, { height = 50, width = 600 })
Transition Options
We can further customize the transition by changing the length of time it should take to complete, the number of times it should repeat, and various other properties. These properties are specified within the option table of the transition.
Delays can be useful when combining transitions. The rectangle created below will fade to black, then fade back in using a second transition including a delay:
The following will cause a rectangle to fade 4 times, each time starting over at alpha = 1:
For example, to make a rectangle fall from the top of the screen and bounce near the bottom, we could use the
The following example changes the text message as the transition begins, and again at the moment it ends:
time
To define how long a transition should take to finish, we can use thetime parameter within the transition function:
transition.to( OBJECT, { time = num_value })
The value is a number that represents the number of milliseconds the transition will last; for instance, specifying a time value of 3000 would create a 3 second transition. If no value is specified, the default time of 500 milliseconds is used.
delay
We can provide an amount of time that should pass before the transition begins, in case we do not want it to occur immediately. This is done by using thedelay parameter, and again specifying the time in milliseconds.
transition.to( OBJECT, { delay = num_value })
For instance, the code
transition.to( myRect, { time = 1500, delay = 2000, x = 500 })
would cause the object to change its horizontal position, and to take 1.5 seconds to do so. However, the transition
would not begin for 2 seconds after it was fired, so the entire process will take 3.5 seconds.
Delays can be useful when combining transitions. The rectangle created below will fade to black, then fade back in using a second transition including a delay:
local myRectangle, myHandler

function myHandler( event )
   transition.to(myRectangle, { time=3000, alpha = 0 })
   transition.to(myRectangle, { time=3000, delay = 3000, alpha = 1 })
end

myRectangle = display.newRect( display.contentWidth/2, 300, 200, 200 )
   myRectangle:addEventListener( "tap", myHandler )
iterations
If you’d like a transition to repeat a particular number of times, you can include aniterations count in the transition parameter list.
transition.to( OBJECT, { iterations = num_value })
This will not be a cumulative transition - if you transition a box from x = 50 to x = 200 , for instance, each
repeat will start over again at x = 50.
The following will cause a rectangle to fade 4 times, each time starting over at alpha = 1:
local myRectangle, myHandler

function myHandler( event )
   transition.to( myRectangle, { time = 3000, alpha = 0, iterations = 4 })
end

myRectangle = display.newRect( display.contentWidth/2, 300, 200, 200 )
   myRectangle:addEventListener( "tap", myHandler )
Also note that the time still refers to the amount of time for each iteration, so if the transition takes 6 seconds and you’re repeating it 5 times, the entire event will take 30 seconds.
Easing
We can also adjust the way a transition takes effect. The default easing for a transition is linear, meaning the beginning, middle, and end of the transition will all appear to be happening with the same “speed”. To adjust this, specify a value for theeasing:
transition.to( OBJECT, { transition = easing.option })
where option is an easing style from the following list:
- Phase In and Out: Use style
continuousLoopto transition in and out, with each piece of the transition appearing linear. - Start slow, end fast: Use
styleinSine,inQuad,inCubic,inQuart,inQuint,inExpo, orinCirc, in increasing order by acceleration. - Start fast, end slow: Use
styleoutSine,outQuad,outCubic,outQuart,outQuint,outExpo, oroutCirc, in increasing order by deceleration. - Start slow, speed up, end slow: Use style
inOutSine,inOutQuad,inOutCubic,inOutQuart,inOutQuint,inOutExpo, orinOutCirc, in increasing order by acceleration. - Start fast, slow down, end fast: Use style
outInSine,outInQuad,outInCubic,outInQuart,outInQuint,outInExpo, oroutInCirc, in increasing order by deceleration. - Exaggerated: Use style
inBack,outBack,inOutBack, oroutInBackto create a slight exaggeration of the transition, along with acceleration effects. - Elastic: Use style
inElastic,outElastic,inOutElastic, oroutInElasticto create an elastic transition, along with acceleration effects. - Bounce: Use style
inBounce,outBounce,inOutBounce, oroutInBounceto create a bounce transition, along with acceleration effects.
For example, to make a rectangle fall from the top of the screen and bounce near the bottom, we could use the
outBounce style:
local myRect, myHandler

function myHandler( event )
   transition.to( myRect, { time=3000, y=900, transition = easing.outBounce })
end

myRect = display.newRect( display.contentWidth/2, 0, 200, 200 )
   myRect:addEventListener( "tap", myHandler )
onStart and onComplete
It is possible to call other functions at the moment a transition begins or ends. These functions are listed in the transition parameter list:
transition.to( OBJECT , { onStart = function1 , onComplete = function2 })
The following example changes the text message as the transition begins, and again at the moment it ends:
local myRect, myHandler, changeStart, changeEnd

function cStart()
   myText.text = "It’s moving!"
end

function cEnd()
   myText.text = "It’s over!"
end

function myHandler( event )
   transition.to( myRect, { y = 900, onStart = cStart, onComplete = cEnd })
end

myRect = display.newRect( 0, 100, 200, 200 )
   myRect:addEventListener( "tap", myHandler )

myText = display.newText( "", display.contentWidth/2, 100, Arial, 30)
A transition can also call a function during other events, such as when it is paused (using onPause), when resumes from a pause (using onResume), when it is cancelled (using onCancel) and at the end of each repetition if an iteration greater than 1 is used (using onRepeat). You can use as many or as few of these function calls as needed.
Pause, Stop, and Resume Transitions
Referencing Transitions
If we only need to use a transition once, and will have no need to pause or cancel it, we do not have to name it. However, multiple transitions running simultaneously on the same object can cause unwanted effects, and we may need to prevent them from interfering with one another. In these cases, it helps to have the ability to refer to the transition itself.Just as with display objects and functions, we can assign a name to a transition so that we may refer to it later:
local var_name = transition.to( OBJECT, { attributes })
Only one transition can have a particular variable name at a time. If we'd like a method of referring to multiple transitions, we can use tags. Tags are assigned in the option table:
transition.to( OBJECT , { tag = name })
The name of the tag is a string, and should be surrounded by quotation marks. Unlike variable names, more than one transition can share the same tag. This gives us a simple way of working with sets of transitions. We can also give a tagged transition a variable name. The following shows two transitions, with different names, but the same tag:
local transition1 = transition.to( object1, { time = 2000, x = 50, tag = "move" })
local transition2 = transition.to( object2, { time = 2000, y = 50, tag = "move" })
Pause or Cancel All Transitions
To momentarily pause (with the intention of later resuming) all running transitions, use the linetransition.pause()Similarly,
transition.resume() and transition.cancel() can be used to resume all paused transitions, or cancel all transitions, respectively. Note that there is no parameter passed to the pause, resume, or cancel function.
Pause or Cancel A Single Transition
If you’d like to control a single transition, you’ll need to give it a unique name, and pass that name to the pause, resume, or cancel function as needed.The following example pauses the transition that moves the rectangle, but not the transition that changes it’s alpha value.
myRect = display.newRect( 400, 800, 400, 100 )
local myTransition1 = transition.to( myRect, { x = 200 })
local myTransition2 = transition.to( myRect, { alpha = 0.4 })
transition.pause( myTransition1 )
Similarly, transition.resume() and transition.cancel() can be used to resume or cancel all transitions with a particular name by passing the variable name as a function parameter.
Pause or Cancel All Transitions With the Same Tag
If we’d just like to control a particular set of transitions, we can use the pause, resume, and cancel functions and pass the parameter of the tag name. In the example below, we create three transitions, but cancel only the two with the tag "slide":
transition.to( object1, { x = 200, tag = "slide" })
transition.to( object2, { y = 600, tag = "slide" })
transition.to( object3, { alpha = 0.5, tag = "fade" })
transition.cancel( "slide" )
Similarly, transition.resume() and transition.cancel() can be used to resume or cancel all transitions with a particular tag by passing the tag string as a function parameter.
Pause or Cancel All Transitions on an Object
We can use the pause, resume, and cancel functions and pass the parameter of an object name. This will control all transitions that are applied to a particular object at once. In the example below, we create three transitions, but cancel only the two on the object object1:
transition.to( object1, { x = 200 })
transition.to( object1, { y = 600 })
transition.to( object2, { alpha = 0.5 })
transition.cancel( object1 )
Similarly, transition.pause() and transition.resume() can be used to pause or resume all transitions on a particular object by passing the object name as a function parameter.
Image Sheets
Before we can begin using sprites, we need to create an image sheet (also called a sprite sheet, texture atlas, or image map). This is done outside Corona, using your favorite illustration or imaging software. For animations, the idea is to make a series of images that, when quickly displayed on screen in order, create the effect of fluid motion. You could think of it as creating a “digital flip book”.
We’ll use these images sheets to create sprites, and you’ll often hear references to “sprite sheet” instead of “image sheet” in these circumstances. However, as we’ll see in later chapters, these sheets can be used to create more than just animated sprites, so we’ll continue to use the more general term. We’ll use “sprite sheet” when referring to the Corona sprite sheet object that we’ll create from the image sheet file.
There are two types of image sheet - a rectangular layout, or a packed layout. In a rectangularly arranged image sheet, the images (each representing a single frame of an animation) are laid out next to each other or tiled so that each image can be placed in an invisible box of the same width and height. You’ll want to position these images so that there is a minimum of wasted space, but so that are at least a few pixels between images. This is the layout we'll be using in class examples, though you're free to experiment with packing software for your own projects.
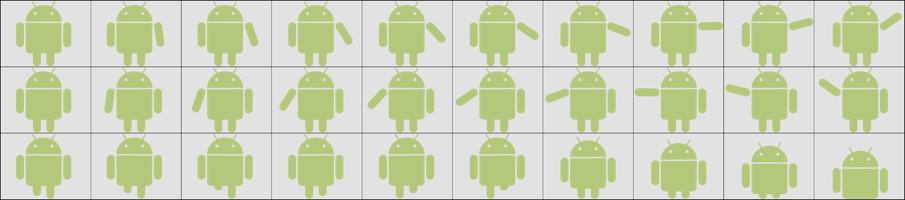
As an example that we'll be using throughout these notes, a rectangular sprite sheet has been created out of frames of several different animation sequences:
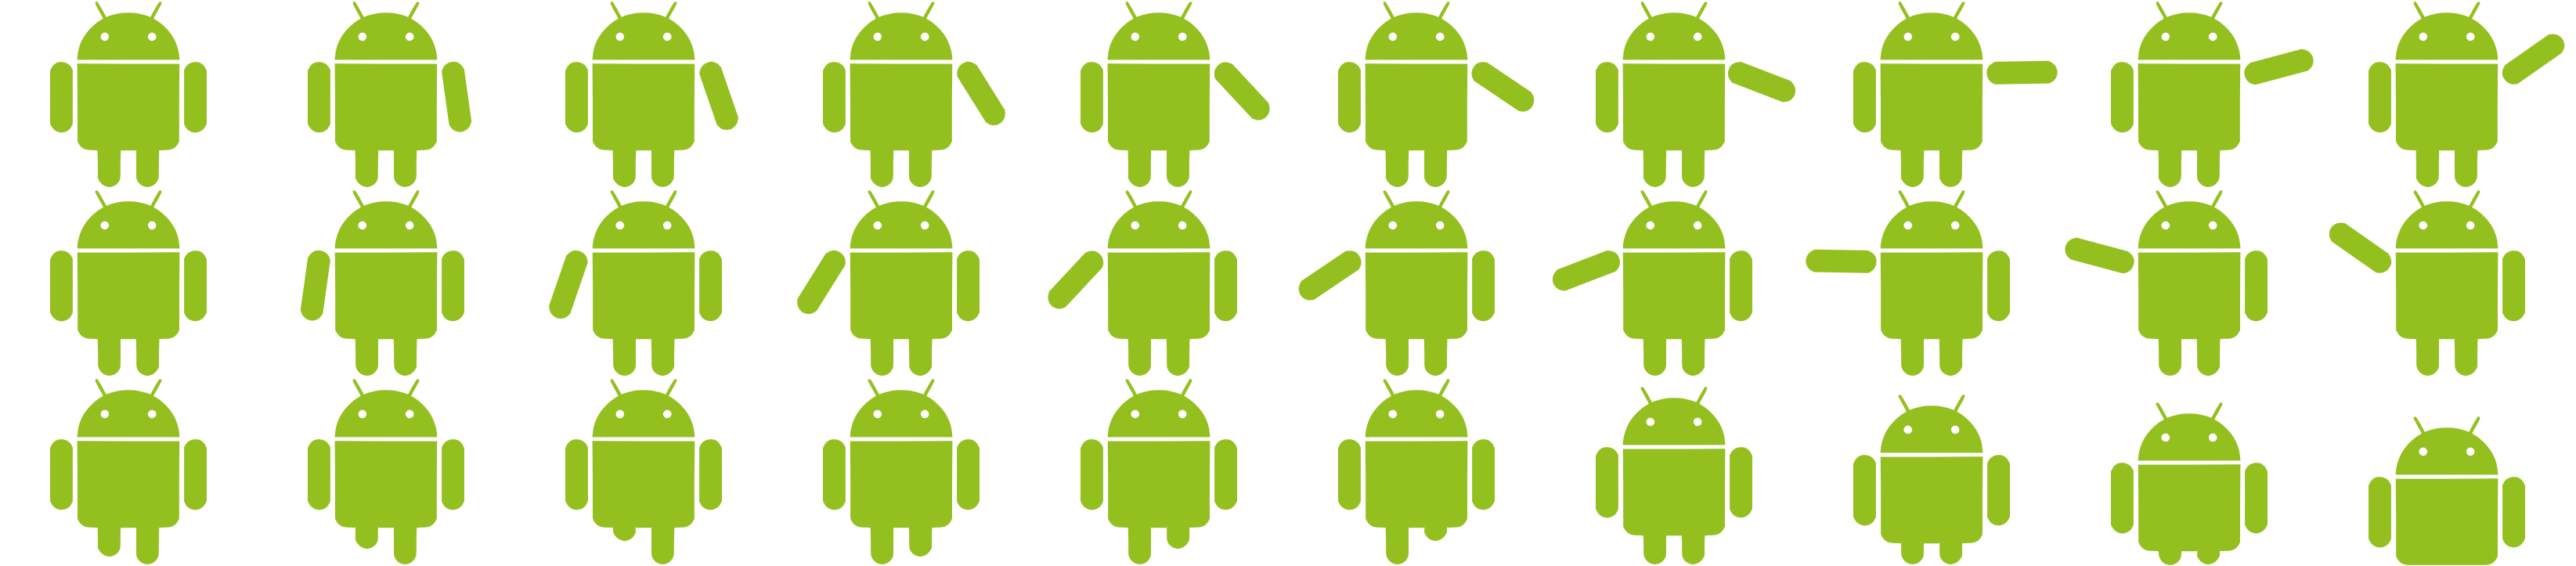 Note that we can draw a grid over this sheet, where each box in the grid contains one frame of the animation and all boxes are the same size:
Unless you’re able to create your images with the exact background color of your app, you’ll want Corona to be able to not show any whitespace surrounding your images. For this reason, it is highly recommended that you save your image sheet as a .png file with transparency preserved. Note, however, that any white areas of your image will also become transparent. To avoid this issue, try making any white areas of the actual image slightly off white. The difference will not be apparent to the user, but the area will look white in your app instead of invisible.
Creating all of the frames of your image sheet is very time consuming, and you should experiment with all software available to find one you prefer. Creating the images can be done using a paint program, image editor, or vector illustration software.
Sprite creation software is available, though it's still a tedious effort to produce image sheets for animated sprites. Generally, each frame of the animation will be drawn individually, often by making minor adjustments to the previous frame. Pixelated sprites are usually created this way. You can use any illustration or image editing software to create these, but some dedicated software for drawing pixel art sprites include:
Next, we’ll define an image sheet using the image file, and tell Corona to use the information in the table to interpret it. We’ll need to name our sheet:
To follow along with the example below, save the following image to the same folder as your main.lua file:
Do not change the size, type, or name of the file (it should be saved as "android_sheet.png"). In the main.lua file, we’ll define a table called androidSheetTable and then create a sprite sheet called androidSheet.
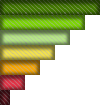
For instance, suppose you've created the following image sheet, containing the various stages of a character's "health bar" for a game.
 You can create an image sheet, with accompanying data table, for this sheet as follows:
We’ll use these images sheets to create sprites, and you’ll often hear references to “sprite sheet” instead of “image sheet” in these circumstances. However, as we’ll see in later chapters, these sheets can be used to create more than just animated sprites, so we’ll continue to use the more general term. We’ll use “sprite sheet” when referring to the Corona sprite sheet object that we’ll create from the image sheet file.
There are two types of image sheet - a rectangular layout, or a packed layout. In a rectangularly arranged image sheet, the images (each representing a single frame of an animation) are laid out next to each other or tiled so that each image can be placed in an invisible box of the same width and height. You’ll want to position these images so that there is a minimum of wasted space, but so that are at least a few pixels between images. This is the layout we'll be using in class examples, though you're free to experiment with packing software for your own projects.
As an example that we'll be using throughout these notes, a rectangular sprite sheet has been created out of frames of several different animation sequences:
Tips for Creating Image Sheets
If the images in a sheet are touching one another, you’ll see the edge of the previous or next frame during the animation. This is due to the way OpenGL (the graphics API used by Corona) interpolates images. The amount of space left depends on how much scaling will be involved. If you’re displaying all images at their saved resolution, leave a pixel around each image (so there are two pixels of space between them). If you’re saving versions of the image sheet at “@2x”, leave 4 pixels. If you have a version saved at three times the standard resolution, leave 6 pixels, and so on. In most cases, a two pixel buffer between images will work fine.Unless you’re able to create your images with the exact background color of your app, you’ll want Corona to be able to not show any whitespace surrounding your images. For this reason, it is highly recommended that you save your image sheet as a .png file with transparency preserved. Note, however, that any white areas of your image will also become transparent. To avoid this issue, try making any white areas of the actual image slightly off white. The difference will not be apparent to the user, but the area will look white in your app instead of invisible.
Creating all of the frames of your image sheet is very time consuming, and you should experiment with all software available to find one you prefer. Creating the images can be done using a paint program, image editor, or vector illustration software.
Sprite creation software is available, though it's still a tedious effort to produce image sheets for animated sprites. Generally, each frame of the animation will be drawn individually, often by making minor adjustments to the previous frame. Pixelated sprites are usually created this way. You can use any illustration or image editing software to create these, but some dedicated software for drawing pixel art sprites include:
- piskelapp.com Create pixel art sprites in a web browser and export to .png for use in your app. Fun to play with!
- GraphicsGale A pixel art sprite builder with lots of features. Download for about 2000 yen (a little under $20).
- Pixothello Another feature rich pixel art sprite maker, with lots of tutorials available on their site. Free, with donations accepted.
- Spriter Free, with a Pro license available for $25. Comes with some "art packs" so you can get a feel for how the software works before creating your own image packs. Additional art packs available for purchase. Plenty of tutorials available on their site.
- Spine Essential version costs $69, but has many features. Very popular among developers, and you'll find many tutorials and helpful advice in their forums. Includes Corona runtime library to easily load and render your animation in your app.
Importing Image Sheets
After you’ve created your image sheet, we need to give Corona a set of instructions on how to read it. We begin by creating a table with information about the image sheet. You’ll need to know how wide and tall each frame is (these should all be the same dimensions), the total number of frames, and the total width and height of the image sheet. We’ll also assign a variable name to this table, as we’ll need to refer to it later.
local sheettable = {				-- choose a unique name for the table
	width = width_value,			-- width of each frame
	height = height_value,			-- height of each frame
	numFrames = num_value, 			-- the number of frames
	sheetContentWidth = num_value,		-- total width of the image sheet
	sheetContentHeight = num_value 		-- total height of the image sheet
	}
As usual, these values are all in terms of pixels.
Next, we’ll define an image sheet using the image file, and tell Corona to use the information in the table to interpret it. We’ll need to name our sheet:
local image_sheet_name = graphics.newImageSheet( "filename.png", sheettable )The filename should be the exact name of your image sheet file, including the extension, in quotation marks. Also, include a path to the file if it is not stored in the same folder as the scene’s lua file.
To follow along with the example below, save the following image to the same folder as your main.lua file:
local androidTable , androidSheet

androidTable = {
	width = 329,
	height = 241,
	numFrames = 30,
	sheetContentWidth = 3290,
	sheetContentHeight = 723
}

androidSheet = graphics.newImageSheet( "android_sheet.png", androidTable )
Note we did not need to explain that there are three rows of ten images. Corona uses the size of each frame and the size of the entire sheet to figure out how the frames are arranged. If you run this code, you will not see anything in the simulator. We have not yet created a display object, so there's nothing on the screen.
Displaying a Single Frame
If you're just using image sheets to minimize the number of files included in your app, you'll need a way to reference each image in the sheet.For instance, suppose you've created the following image sheet, containing the various stages of a character's "health bar" for a game.
local healthbarOptions = {
	width = 100,
	height = 15,
	numFrames = 7,
	sheetContentWidth = 100,
	sheetContentHeight = 105
	}

healthbarSheet = graphics.newImageSheet( "healthmeter.png", healthbarOptions )
Now, to display only the first frame (as you might when the game starts and your character has full health), you would define a display object referencing just the first frame:
local myHealth = display.newImage( healthbarSheet, 1 )
Animated Sprites
After Corona has imported our image sheet, we will still not see any of our images on screen, because we have not yet created any display objects. To create and modify the animated sprite object, we'll need to set up some tables.
Alternately, we can create a non-consecutive sequence by specifying which frames should be played, and in which order. Most of the data in the sequence table is the same, except instead of specifying the starting frame and number of frames, we provide a list of the frames to be played:
Conveniently, we can include more than one of these sequences within the sequence table. This means we can create multiple animation sequences from the same sprite sheet. We can also combine the types of sequence (consecutive and non-consecutive) within a single sequence table. Be sure to separate each of these sequence tables with a comma.
If we have only specified one sequence in the sequence table, that will be the one used for the animation. However, we also have the option of specifying which sequence should be used (only one can be used at a time, though it can be changed later). If we do not specify a sequence, the first one in the table will be chosen by default. To use a particular sequence, refer to it by the name used in the table:
Note that the
The Sequence Table
We’ll first create another table contains a series of sequence tables, each giving directions on how to display animations using the frames in our image sheet. We have two ways of creating each sequence: consecutively and non-consecutively. If you have placed the images in your sheet in the order you’d like them displayed, you can use the consecutive sequence style. You can also create an animation using a subsequence of all the frames in your sheet.
local sequencetable = {			-- choose a unique name for the sequence table
	{
	name = sequencename, 		-- choose a unique name for this animation sequence
	start = num_value,		-- starting frame, default is 1
	count = num_value,		-- total number of frames to include
	time = num_value, 		-- time, in milliseconds, of animation
	loopCount = num_value,		-- number of times to repeat, default is 0 for infinite
	loopDirection = "forward" 	-- optional, use either "forward" or "bounce"
	}
}
We need to specify a name for this sequence, as well as which frame to begin with and the total number of frames to play in the sequence. The other arguments above are optional. If not specified, the time value is based on the number of frames, though you will almost certainly want to adjust this. The default loopCount is 0, which causes the sequence to repeat indefinitely. The loopDirection is also optional, and may be set to "forward" or "bounce". When set to forward, the animation ends (or begins the next loop) with the last frame in the sequence. When set to bounce, the animation is played forward and then backward, returning to the original frame.
Alternately, we can create a non-consecutive sequence by specifying which frames should be played, and in which order. Most of the data in the sequence table is the same, except instead of specifying the starting frame and number of frames, we provide a list of the frames to be played:
local sequencetable = {
	{
	name = sequencename, 			-- choose a unique name for this animation sequence
	frames = { x1, x2, x3, ... }, 		-- list of frames to play, in order
	time = num_value, 			-- time, in milliseconds, of animation
	loopCount = num_value, 			-- number of times to repeat, default is 0 for infinite
	loopDirection = "forward" 		-- optional, use either "forward" or "bounce"
	}
}
The frames table can contain any number of frames, in any order, and frame numbers can be repeated. All values in the table should be integers between 1 and the total number of frames in your sheet.
Conveniently, we can include more than one of these sequences within the sequence table. This means we can create multiple animation sequences from the same sprite sheet. We can also combine the types of sequence (consecutive and non-consecutive) within a single sequence table. Be sure to separate each of these sequence tables with a comma.
The Sprite Object
Finally, we’re ready to create the display object that will show our animation. As we’ll see, this display object can be treated in many of the same ways as other display objects - it can be positioned, scaled, and transitioned just as any other images. We’ll give a variable name to this object as usual. We use thedisplay.newSprite function, passing the name of the sprite sheet and sequence table:
local spritename = display.newSprite( spritename, sequencetable )Note that we can create more than one such object from the same sprite sheet and sequence table - this means multiple instances of the animation can occur simultaneously on screen.
If we have only specified one sequence in the sequence table, that will be the one used for the animation. However, we also have the option of specifying which sequence should be used (only one can be used at a time, though it can be changed later). If we do not specify a sequence, the first one in the table will be chosen by default. To use a particular sequence, refer to it by the name used in the table:
local spritename = display.newSprite( spritename, sequencetable )
	spritename:setSequence( sequencename )
Animating the Sprite
To see your sequence play as defined in the sequence table, include the linespritename:play()after defining the sprite and specifying which sequence to use. We can pause the animation at any time using
spritename:pause()We can also skip to a particular frame in the sequence. This would typically be done after pausing the animation.
spritename:setFrame( num_value )Here, the value is the integer value of the frame in the sequence, which is not necessarily the same as the frame number in the sheet.
Note that the
setSequence method can be used at any time after defining the sprite. This means that we create a sprite that performs one animation, and change which animation it plays later, rather than creating an entirely new sprite object. Changing the sequence will stop the former sequence if it is currently being played, and so you’ll need to restart the animation using the play method again.
Example: Animated Droid

local androidSheet, sequenceData, androidSprite, waveRight, waveLeft
local walk, run, courtsey, jump, waverightText, waveleftText, walkText
local runText, courtseyText, jumpText

local w = display.contentWidth

androidTable = {
	width = 329,
	height = 241,
	numFrames = 30,
	sheetContentHeight = 723,
	sheetContentWidth = 3290
}

androidSheet = graphics.newImageSheet( "android_sheet.png", androidTable )

sequenceData = {
	{
	name = "waveright",
	start = 1,
	count = 10,
	time = 800,
	loopDirection = "bounce",
	loopCount = 1
	},
	{
	name = "waveleft",
	start = 11,
	count = 10,
	time = 800,
	loopDirection = "bounce",
	loopCount = 1
	},
	{
	name = "walk",
	frames = { 1, 21, 22, 23, 22, 21, 1, 24, 25, 26, 25, 24 },
	time = 1000
	},
	{
	name = "run",
	frames = { 1, 21, 22, 23, 22, 21, 1, 24, 25, 26, 25, 24 },
	time = 600
	},
	{
	name = "courtsey",
	frames = { 1, 27, 28, 29, 30 },
	time = 400 ,
	loopDirection = "bounce",
	loopCount = 1
	}
}

androidSprite = display.newSprite( androidSheet, sequenceData )
androidSprite.x = w/2
androidSprite.y = 300
androidSprite.xScale, androidSprite.yScale = 2, 2

function waveRight( event )
	androidSprite:setSequence( "waveright" )
	androidSprite:play()
end

function waveLeft( event )
	androidSprite:setSequence( "waveleft" )
	androidSprite:play()
end

function walk( event )
	androidSprite:setSequence( "walk" )
	androidSprite:play()
end

function run( event )
	androidSprite:setSequence( "run" )
	androidSprite:play()
end

function courtsey( event )
	androidSprite:setSequence( "courtsey" )
	androidSprite:play()
end

function jump( event )
	androidSprite:setSequence( "courtsey" )
	androidSprite:play()
	transition.to( androidSprite, { y = androidSprite.y-50, time = 200 })
	transition.to( androidSprite, { y = androidSprite.y , time = 200, delay = 200 })
end

waverightText = display.newText("Wave Right Arm", w/2, 700, Arial, 30)
	waverightText:addEventListener("tap", waveRight)
waveleftText = display.newText("Wave Left Arm", w/2, 750, Arial, 30)
	waveleftText:addEventListener("tap", waveLeft)
walkText = display.newText("Walk", w/2, 800, Arial, 30)
	walkText:addEventListener("tap", walk)
runText = display.newText("Run", w/2, 850, Arial, 30)
	runText:addEventListener("tap", run)
courtseyText = display.newText("Courtsey", w/2, 900, Arial, 30)
	courtseyText:addEventListener("tap", courtsey)
jumpText = display.newText("Jump", w/2, 950, Arial, 30)
	jumpText:addEventListener("tap", jump)
Note that we included a transition in the “jump” function. The animation sequence is the same as that used for the “courtsey” function, which makes the robot crouch momentarily. As you tap each of the text commands on screen, the robot stops what he was doing (if anything) and begins the new sequence. A sprite may only perform one animation at a time.
For another example, we'll combine a sprite animation and a traditional transition. A runtime event listener is waiting for any touch of the screen. When a touch is detected, the droid is set to the "run" animation sequence, and is transitioned to the location of the touch. At the end of that transition, the animation sequence is changed to a new sequence called "sit":
local androidSheet, sequenceData, androidSprite, waveRight, waveLeft
local walk, run, courtsey, jump, waverightText, waveleftText, walkText
local runText, courtseyText, jumpText

local w = display.contentWidth

androidTable = {
	width = 329,
	height = 241,
	numFrames = 30,
	sheetContentHeight = 723,
	sheetContentWidth = 3290
}

androidSheet = graphics.newImageSheet( "android_sheet.png", androidTable )

sequenceData = {
	{
	name = "run",
	frames = { 1, 21, 22, 23, 22, 21, 1, 24, 25, 26, 25, 24 },
	time = 600
	},
	{
	name = "sit",
	frames = { 1, 27, 28, 29, 30 },
	time = 200 ,
	loopCount = 1
	}
}

androidSprite = display.newSprite( androidSheet, sequenceData )
androidSprite.x = w/2
androidSprite.y = 300
androidSprite.xScale, androidSprite.yScale = 2, 2

function sitAndStop()
    androidSprite:setSequence( "sit" )
	androidSprite:play()
end

function moveDroid( event )
	androidSprite:setSequence( "run" )
	androidSprite:play()
	transition.to( androidSprite, { y = event.y, x = event.x, time = 1000, onComplete = sitAndStop })
end

Runtime:addEventListener( "touch", moveDroid )
A sample is shown in the gif below (don't worry, it'll look smoother in practice than in a gif):